2023
SmartCow
App for controlling AI powered cameras

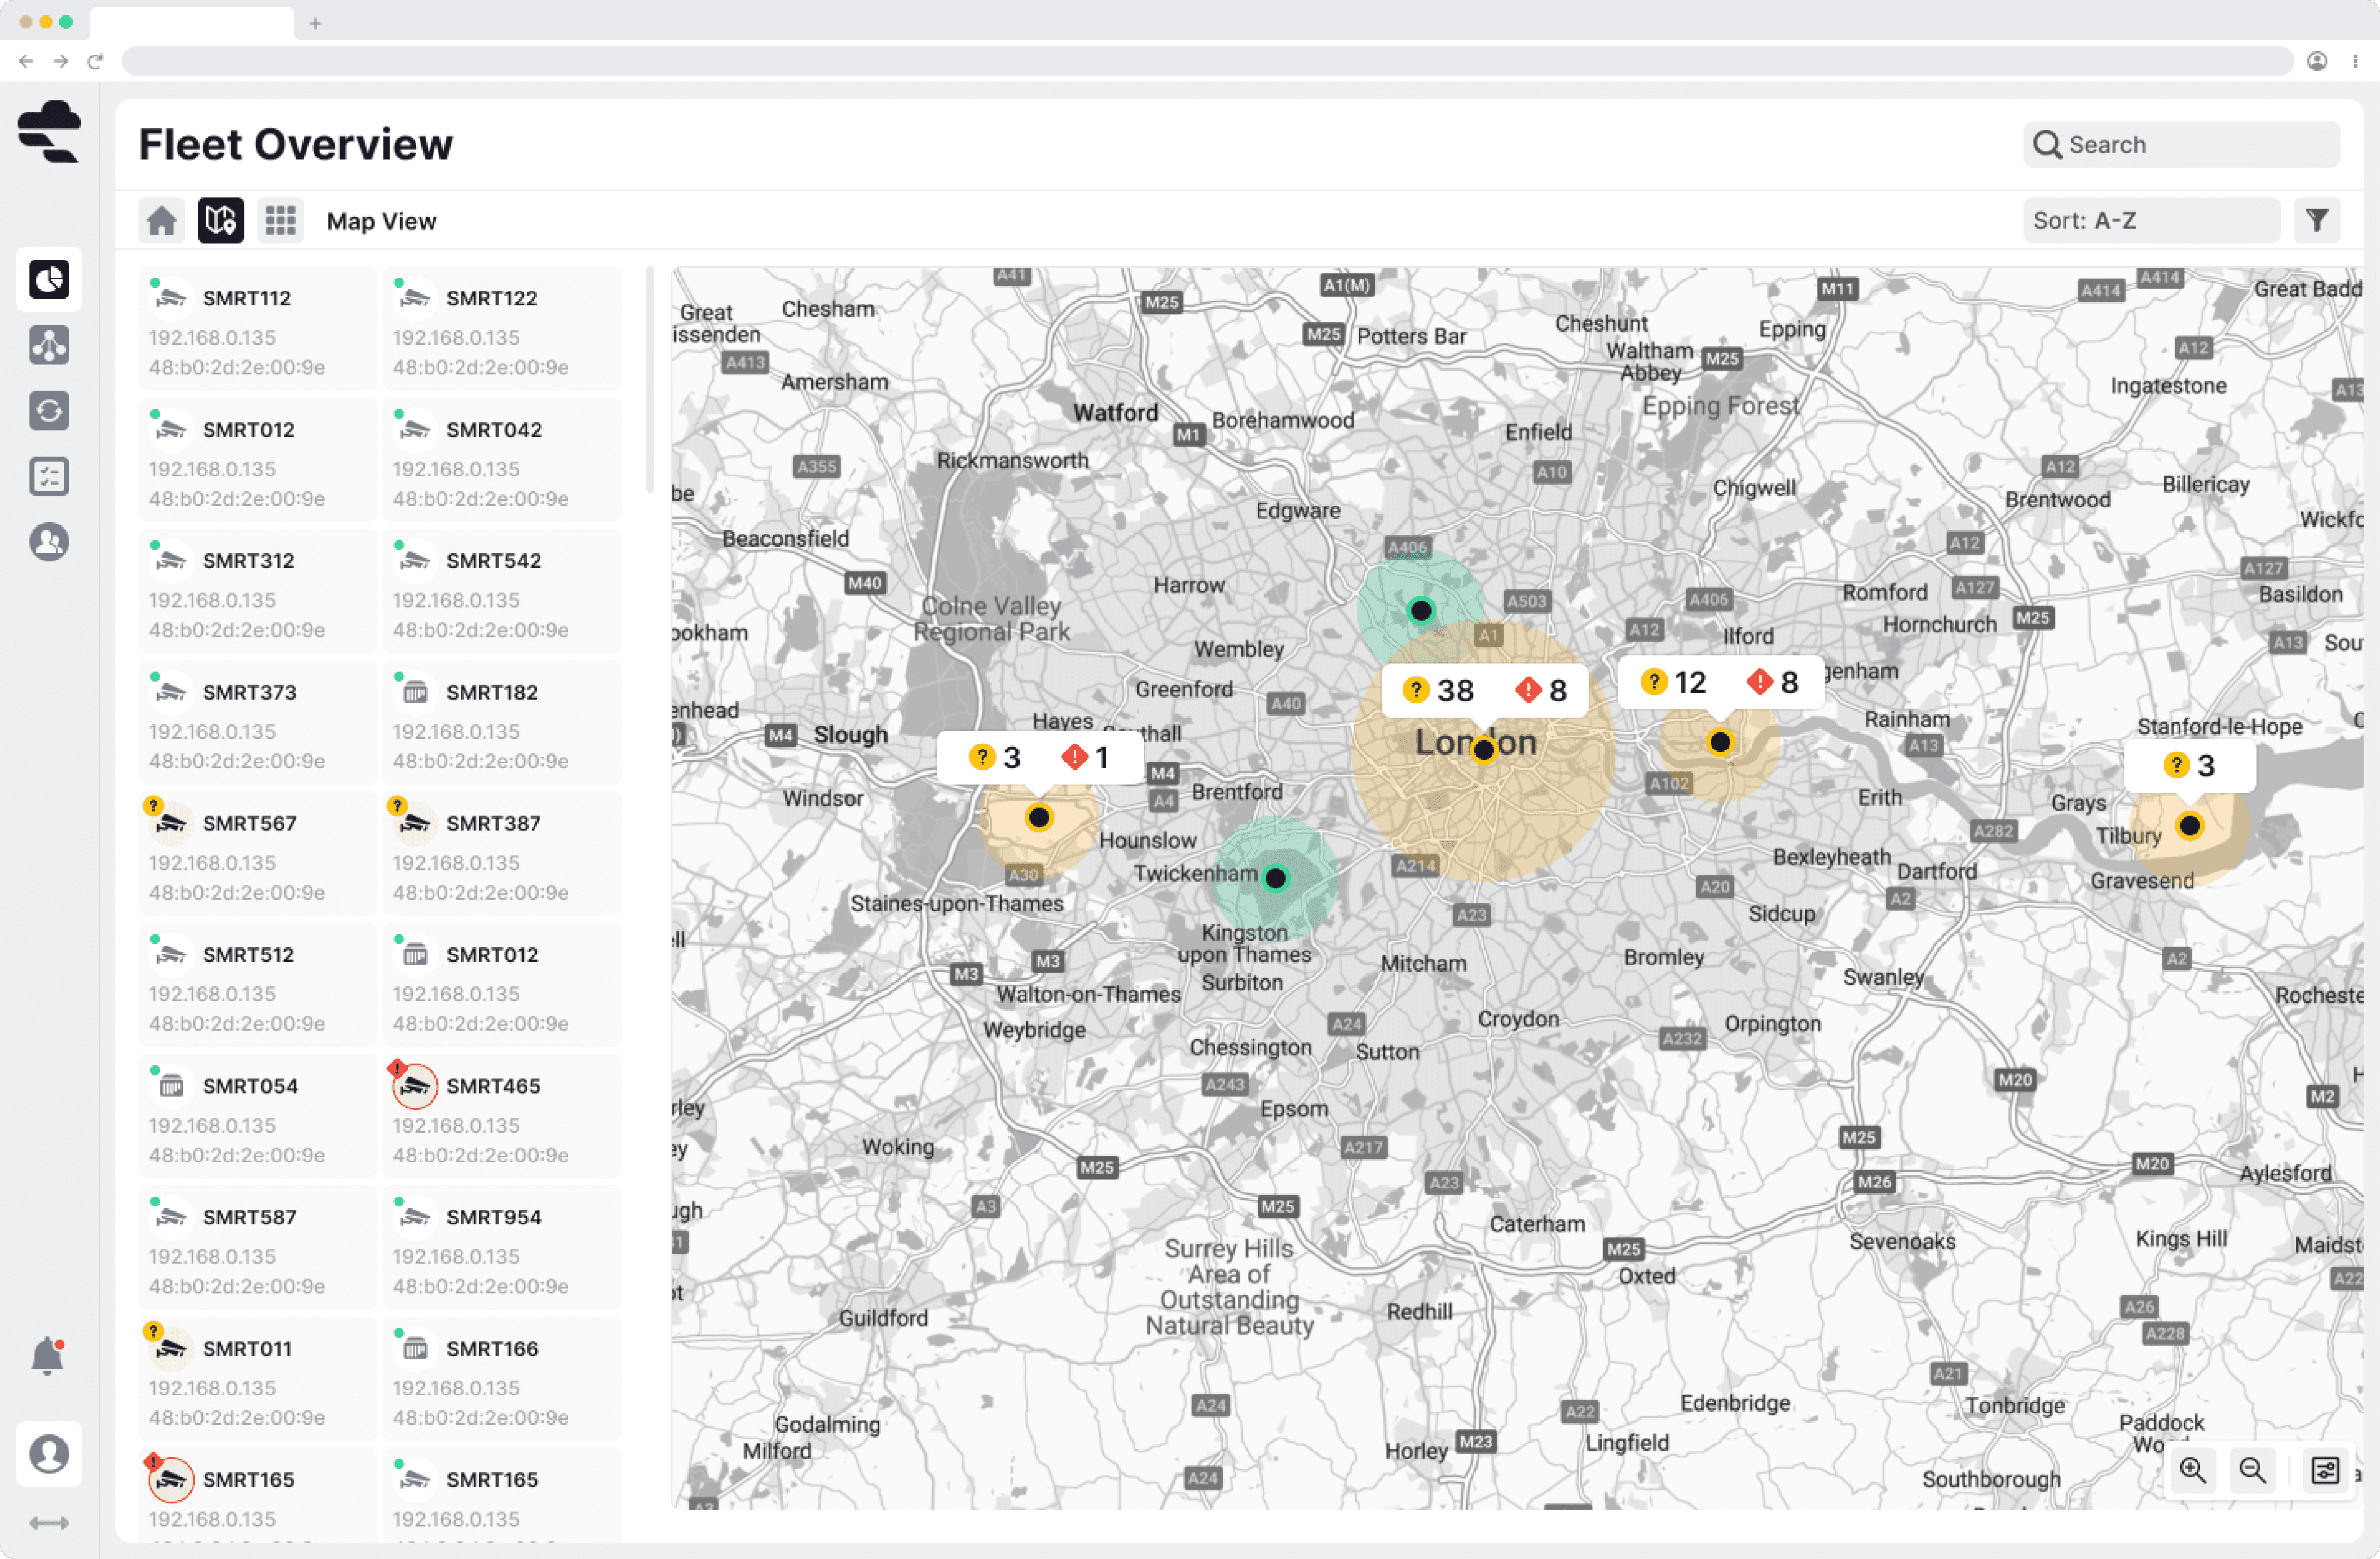
Sphinx is a self-contained, ruggedized AI camera runnning NVIDIA Jetson OrinTM NX and XavierTM NX. Ther cameras include dual image sensors focused on advanced AI applications, including automatic number plate recognition (ANPR), public safety, and intelligent traffic management system (ITMS).
Sphinx Web UI is a tool for controlling our Sphinx Range of Smart Cameras. To ensure the best quality image output of the device, leading to better data collection and model performance, it was vital we created an interface that allowed our users to edit image & device settings from the preview.
Design Stage time frame
1 month for MVP, 3 months for V1 & V2, on-going
Project Type:
New Product MVP & V1
Product Design, UI Design
I was the lead designer on this project.
Team
Design Team (1)
FE Dev Team (2)
BE Dev Team (3)
Seeing Opportunity
Fundamental to AI applications is the data input. This is true for both live analysis on devices and for training after the fact. As such we needed to ensure that our users had the ability to manipulate the device sensor output by directly controlling the hardware settings remotely.
Challenges/Obstacles
Time & Resource constraints
We had an extremely keen client who was already testing our Sphinx cameras in their live system and wanted to ensure we got something to them quickly. We saw this as a good opportunity to get direct customer feedback on our new product line.
So we agreed that we would start with an MVP and over the course of multiple highly cooperative feedback sessions would slowly implement other features and bug fixes that arose during their testing.
This meant our turn around times needed to be quick, however the company was extremely busy at the time so our team resources were limited to only 1 designer, 1 FE dev and 3 BE devs.
Understanding the camera settings
The first place I needed to start was to gain an understanding of the controls / settings that the user would need access to via the UI. The team provided the spec sheet for each of the lens's in our camera and I set about creating a document that listed the settings and the type of interaction that would be needed to manipulate the setting. (Eg. slider vs toggle etc)

Prioritisation and grouping settings with users
With such a range of different settings, I knew that we would need a way to simplify the UI in order to make it easy for our users to find specific settings quickly. I suggested we group the settings by relevance and to display the settings most used / most important first.
However, I am not an expert in hardware settings and so I created a Notion board and held a workshop meeting where the project team collaborated with our hardware team to:
Double check I had chosen the correct type of setting interaction
Create & Name Groups
Rank the “Priority” level of all settings / setting groups
Share any dependencies that were present between different settings

MVP user stories
Following some initial discussions with our client the product team worked to create an initial set of user stories on which to base the MVP.
The priority at this point was to get something into the client’s hands asap so we focused on the basics.

Wireframes
With these simple stories, I created some basic sketches and wireframes following the well-established design pattern of a central workspace/canvas with settings side panel.


MVP Screen Design
To get started with a basic MVP that we could quickly get in the hands of our clients for testing, I began designing basic layouts and components.
General Layout


Setting components

Feedback sessions
This went from design to development in less than 2 months and we handed over to our client. They ran tests in the field and returned to us with feedback and were very open to feedback.
Insights
Save settings as Presets and Schedule Presets.
The biggest request that our client wanted to see was the ability to save specific setting configurations as “presets”.
They could then export these presets and use them in other cameras which helped speed up the installation process.
On top of this, we discussed the options to use multiple resets in one day. For example one preset for early morning and late afternoon where the light was lower, one for mid day when light was at its highest and one for the night-time.
General UI Improvement feedback
Through short feedback workshops we gather some other useful information that we could use to improve the interface and experience for users.
Add the ability to “fullscreen” one camera feed to make viewing the setting changes easier.
Merge preview & settings - make setting changes instantly viewable on the live video.
Make it clearer which lens the user was editing.
Edit some setting components to make their affects more obvious to the user.
Updated MVP user stories
We took this user feedback onboard, updated our user stories and began implementing changes to meet the customer new needs.
Adding Pre-sets and scheduling
Before beginning any design work it was important to understand the basic functionalities we wanted to add to out product. To do this we brainstormed some of the most common options a user would need so I could create an initial design artifact that the team could then iterate on.
Preset functionality:
See list of presets available
Create preset
Edit preset
Delete preset
Duplicate preset
See which presets are active / scheduled
Set preset as Default
Scheduling functionality:
See schedule
Add/remove scheduled preset (Default schedule should have minumum 2 presets
Edit scheduled preset
Edit time scheduled preset
Following some discussions and feedback with the team, I developed these mocks-ups into the Version 1 design alongside some small UI improvements.


General UI improvements
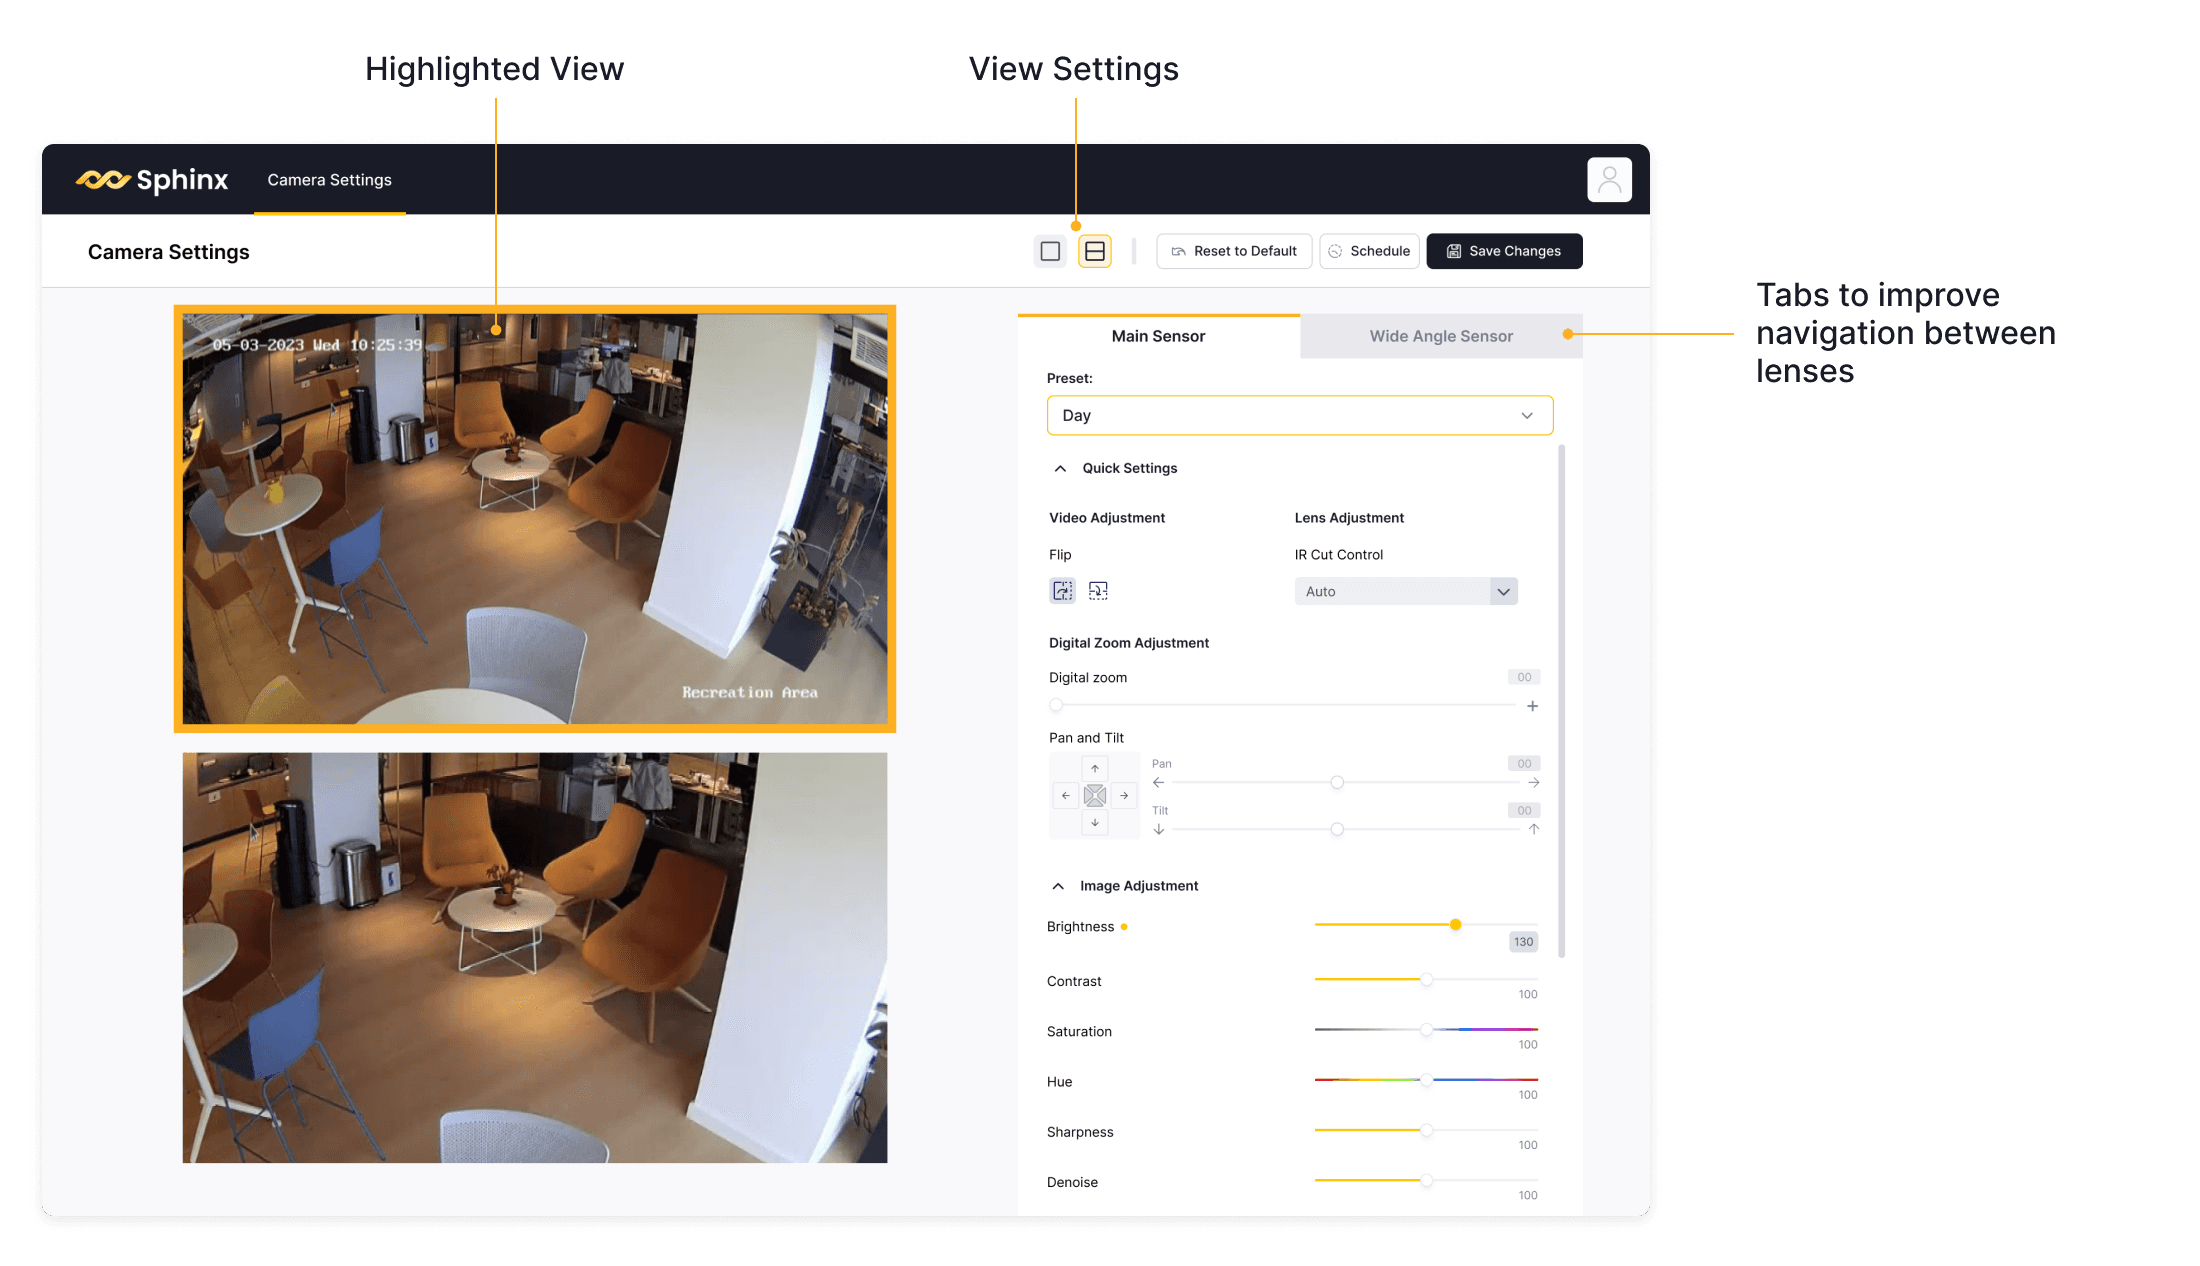
Another change requested in the feedback session was to have the live previews and settings page be combined. so the user could see the settings changes affect the live stream in real time.
I added this and some indications to show which lens the settings were being applied to as well as two viewing options; 1 live view (currently selected in settings bar) or both live views.

Custom Settings
One of the requests from MVP was to improve the settings control for the Pan and Tilt controls as they were difficult to understand.
I decided to implement more visual/graphical based custom setting controls.

Feedback sessions
These new updates were pushed to production asap and we scheduled further feedback sessions with our customer. Over the course of 3 months of in-field testing and meetings with our customer, we gathered more insights, feedback and potential opportunities to improve.

Insights
Day and Night Automation
Building on the addition of presets and scheduling, the team decided to introduce the idea that presets could be automated using the camera’s internal light sensor.
We shared this idea with the customer who was happy with the idea and said they would test it.
We also built and tested multiple presets for different light conditions and use cases that we would pre-install on the device improving the onboarding experience for users.
Extra functionality and QoL improvements
An issue that arose during the testing of the scheduling feature was that the devices time zone was not editable via the UI, we added a fix to allow users to do this.
I also added functionality that allowed certain settings to be applied to all presets when changed on one. This removed the need for users to adjust these in their existing presets when the cameras position was adjusted.
Part of the users workflow required still images from the camera views to accurately draw bounding boxes. We found the user was screenshotting the browser window to do this. I added a button that would save high quality screen shots for the user.
I removed the top action bar and made the settings side-bar slightly narrower to give more space to the camera previews
I added tool tips to show the lens specification in the UI
I added tags on the preview windows to make it easier for the user to see what presets were applied to the preview.
Updated MVP user stories
As before, we took the user feedback and insights onboard, updated our user stories and began implementing changes to meet the customer new needs.

Day & Night automation
The largest change we wanted to implement was the option for the user to chose between scheduled preset changes (base on set times) and a Day & Night automated preset (that used the in-built light sensor).
As our customer was happy and comfortable with the existing preset functionality, I aimed to change the design and experience as little as possible.
The only major design elements that needed to be added for this new functionality were:
A toggle on/off switch for the light/dark mode & scheduled mode
A section to assign the Day preset and Night preset.
A threshold control (allowing the user to select what light level they wanted the change to occur at).


Group changes to Pre-sets
From the testing in the field, we found that cameras often moved position slightly due to outside influences like windy weather. While the movement wasn't enough to require a technician to visit the site and reposition the camera, it sometimes required the user to edit the lens settings.
The issue that arose however, was that if the user had set up many presets with the now inadequate settings, they would need to manually edit every single preset to update just one setting.
Through feedback sessions we created an initial list of settings that may be common culprits for this type of issue, and implemented an option in the settings where the user could chose to sync these settings across all presets when change in one.

Change default preset

Edit time zones

UI Improvements
As mentioned in the Insights section above, there were some other smaller UI improvements that I wanted to make, focused around improving the use of space, and improving the experience.

Feedback sessions
As of writing the case study, the client is currently testing the new release of V2. The team has feedback sessions scheduled soon where we hope to find more opportunities for improvement.
Although our next set of feedback sessions hasn't begun yet, the team is already working on some ideas and improvements for the products. These are very much concepts or prototypes at this point and may or may not be added to the next version.
Quick Set-Up guide
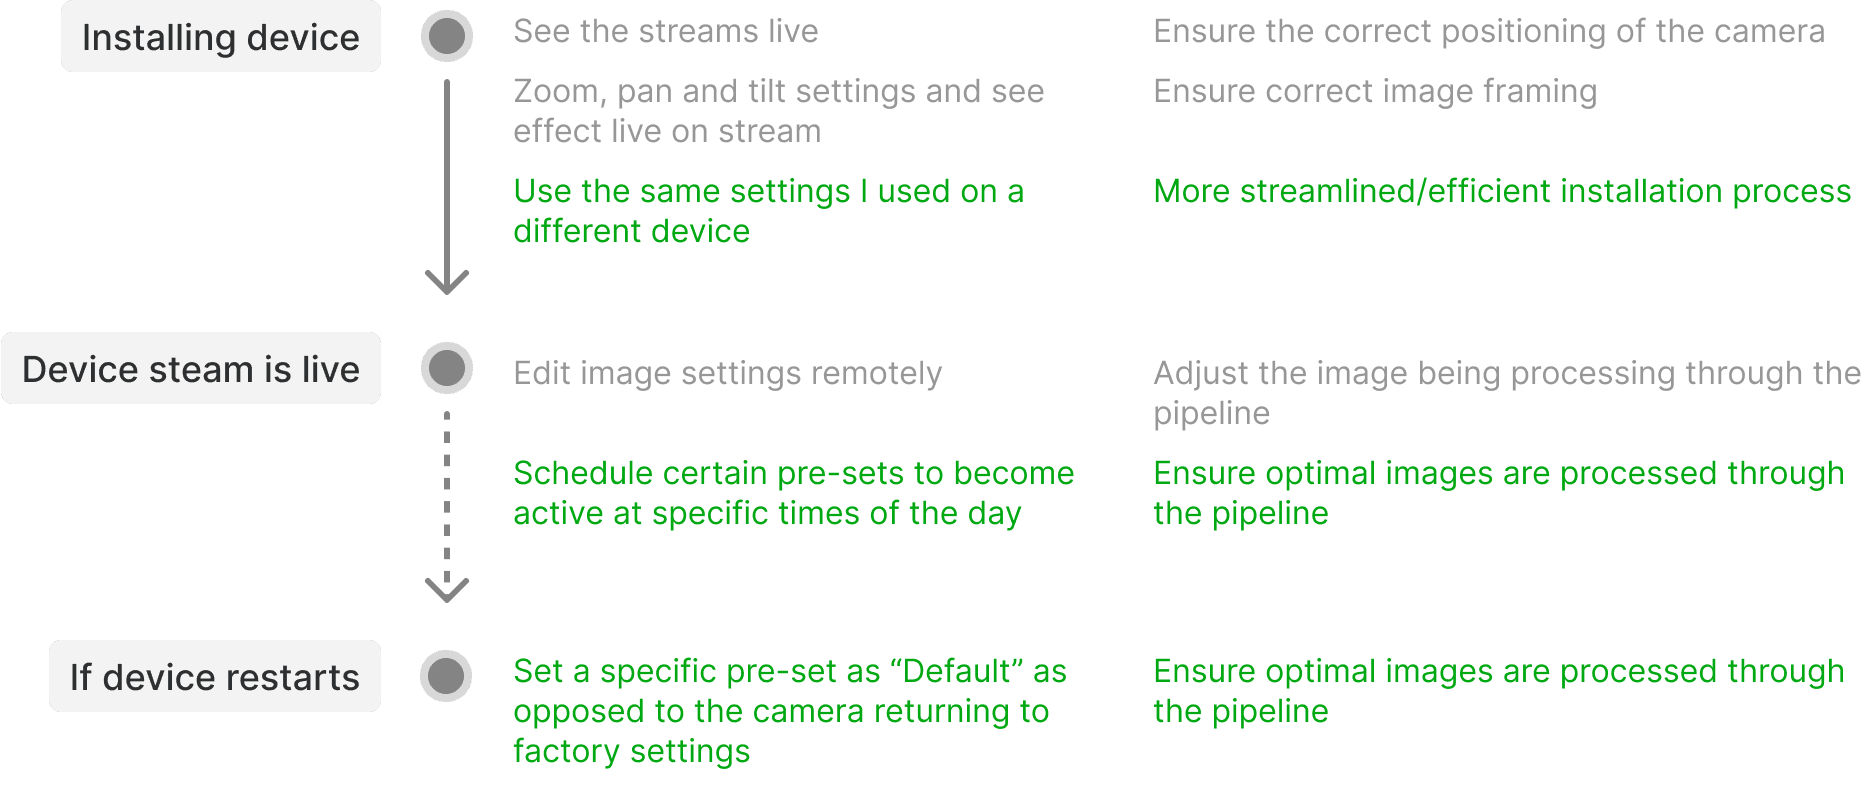
Over the course of the project we have got a good idea of the common details and settings that the installation technician accesses while first installing the device.
I proposed that we create a Quick Set-Up experience, somewhat like an onboarding experience, that will quickly give the technician a step-by-step flow through the settings that matches their general process.
While we are expecting the technicians to be very familiar with navigating and adjusting settings in the current version, this Quick Set-Up would make their installation process quicker and easier.
Historic / Change log
Another feature that could be useful is a log of the changes made to each preset.
This is more of a QoL feature that would be useful if users wanted to revert to a previous settings configuration, or see if and when certain presets were edited.